FLUX.1 Models
In this article, we'll walk you through the steps to effectively use FLUX.1.
Admin
8/27/20244 min read


The open-source community has recently embraced FLUX.1, a groundbreaking text-to-image generation model, which comes on the heels of the SD 3 Medium and Kolors releases. Created by former key members of Stability AI, FLUX.1 not only surpasses the quality of SD 3 but also competes closely with the closed-source Midjourney v6.1 model. This makes FLUX.1 a new standard in AI-generated art, bringing renewed energy to the advancement of open-source AI art.
The minds behind FLUX.1 belong to Black Forest Labs, a company established by the original team that developed Stable Diffusion, along with several former researchers from Stability AI. Similar to Stability AI, Black Forest Labs is committed to creating top-tier multimodal models and releasing them as open-source tools. The company has already secured $31 million in seed funding. You can learn more about them on their website: https://blackforestlabs.ai/.
FLUX.1 is available in three versions: Pro, Dev, and Schnell. The Pro and Dev models both outperform leading models like SD3-Ultra, setting a new standard in the industry. Even the more compact FLUX.1 [schnell] outshines larger competitors such as Midjourney v6.0 and DALL·E 3, proving its exceptional capability despite its smaller size.
Try FLUX.1 Online For Free
Here are some websites where you can experience the FLUX.1 model online. If you just want to explore and use this powerful text-to-image model, free online access is the best option for you.
Hugging Face (Free | Limited Usage Frequency)
FLUX.1-dev:
https://huggingface.co/spaces/black-forest-labs/FLUX.1-dev
FLUX.1-schnell:
https://huggingface.co/spaces/black-forest-labs/FLUX.1-schnell
fal.ai (Free | $1 Free Credit)
FLUX.1 schnell:
https://fal.ai/models/fal-ai/flux/schnell/playground
FLUX.1 dev:
https://fal.ai/models/fal-ai/flux/dev/playground
FLUX.1 pro:
https://fal.ai/models/fal-ai/flux-pro
After logging in with GitHub, you will receive $1 in credit, which allows you to use FLUX.1 pro 20 times, FLUX.1 dev 40 times, or FLUX.1 Schnell 333 times for free.
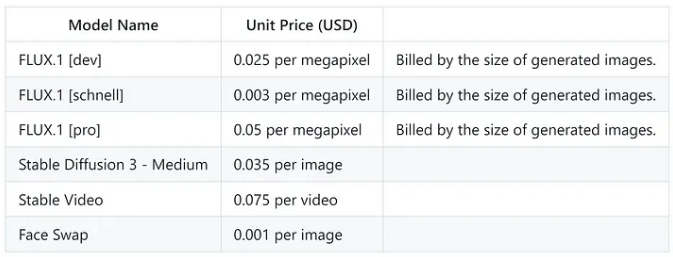
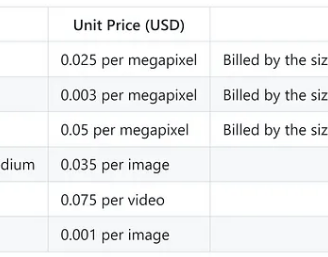
Here is the pricing table for fal.ai:
Install ComfyUI
The official ComfyUI GitHub Repository provides a basic guide for installation methods, including Windows, Mac, Linux, and Jupyter Notebook.
In this article, we will demonstrate the installation and usage process step by step, using a Windows system with an Nvidia GPU as an example.
ComfyUI Official Repository Address: ComfyUI’s GitHub Repository
To get started with ComfyUI, you can visit the [official GitHub repository](https://github.com/comfyui/comfyui) where you'll find all the resources needed for installation. Look for the blue "Direct Link to download" in the ReadMe section—this link will guide you to the official integrated package.
Once you've downloaded the package, unzip it to your desired local directory. (I recommend using 7-Zip for handling compressed files.) After decompression, your file directory should resemble the structure outlined in the repository.
Run FLUX.1 On ComfyUI
In the ComfyUI_windows_portable directory, you can see two files run_cpu.bat and run_nvidia_gpu.bat, you can choose to run according to the following instructions.
ComfyUI_windows_portable
├── ...Other files are omitted
├── run_cpu.bat // Double-click to run it to start ComfyUI when your graphics card is A card or only CPU
└── run_nvidia_gpu.bat // Double-click to run it to start ComfyUI when your graphics card is N card (Nvidia)
If you encounter the following error:
PermissionError: [Errno 13] error while attempting to bind on address ('127.0.0.1', 8188): an attempt was made to access a socket in a way forbidden by its access permissions
You can try opening CMD with administrator privileges and executing the following command:
net stop winnat
net start winnat
Then run the startup script again.
As shown in the figure above, when you see “To see the GUI go to: http://127.0.0.1:8188”
It means that ComfyUI has been successfully launched. If the browser does not start normally, you can directly access the website after To See the GUI go to: through the browser, such as in the example above, it should be http://127.0.0.1:8188.
The opened webpage is as follows:
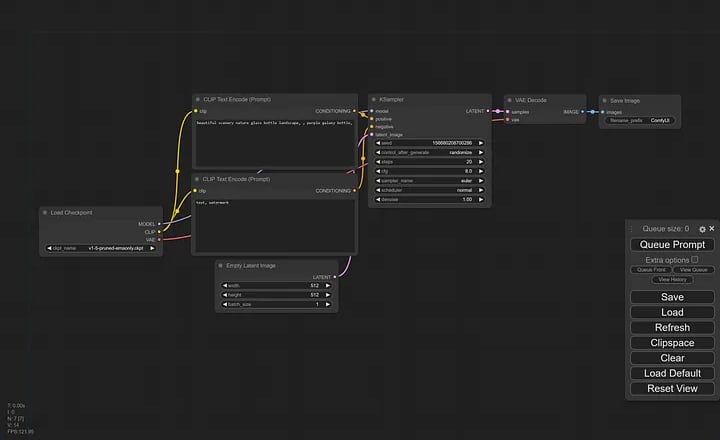

Select FLUX.1 ComfyUI Workflow Example
Building workflows in ComfyUI is a process that requires significant time and learning. If you prefer a more hands-on and ready-to-use experience, using a template is the best option. This article won’t delve into how to build workflows but will provide some examples that you can directly run.
Choose the workflow example you need from below, copy the code, and save it as a json file (you can paste it into a txtfile, save it, and then change the file extension from txt to json). If you're unsure which one to choose, you can select the first one.
Go back to the workflow interface webpage you previously opened (if you haven’t opened it yet, please refer to the previous section). On the main interface, click the load button on the right side to load the workflow file.
Later in the article, we’ll also include ready-to-use workflows for LoRA and ControlNet.
Find more workflow examples at: https://openart.ai/workflows/all?keyword=flux
We are a non-profit community of AI enthusiasts and researchers dedicated to exploring and advancing the latest in generative AI technology. We are not affiliated with BlackForestLabs.ai